在 Word 文件中僅對特定頁面(而非全部頁面)套用插入水印
預設情況下,Word 會將浮水印套用至文件中的所有頁面;若您只想在特定頁面插入浮水印,本文提供的方法可協助您輕鬆達成目標。
在 Word 文件的特定頁面中插入插入水印
在 Word 文件的特定頁面中插入自訂浮水印
在 Word 文件的特定頁面中插入插入水印
您可以使用此方法將 Word 預設浮水印套用至特定頁面:
- 前往您要套用浮水印的頁面。
- 點選「版面配置」>「浮水印」。
- 在您想要的浮水印上按一下滑鼠右鍵,然後選取「插入至目前文件位置」。


所選浮水印現僅會顯示於指定頁面。
注意:此方法僅支援 Word 預設的文字浮水印。若要在特定頁面插入自訂文字或圖片浮水印,請使用下列方法。
在 Word 文件的特定頁面中插入自訂浮水印
若僅在特定頁面插入自訂浮水印,請依照下列步驟操作:
步驟 1:建立自訂圖片或文字水印,並插入至所有頁面
- 點選「版面配置」>「浮水印」>「自訂浮水印」。

- 在「列印浮水印」對話方塊中:
- 若要插入圖片水印,請點選「圖片水印」,上傳圖片後,立即點擊「確定」完成設定!
- 若要插入文字水印,請點選「文字水印」,自訂所需選項後,再按一下「確定」。


這會將您的自訂浮水印插入至所有頁面。
步驟 2:將自訂浮水印儲存至圖庫
- 在文件頁首區域按兩下,即可進入頁首編輯模式;接著點選任意頁面上插入的自訂浮水印以進行選取。

- 點選「版面配置」>「浮水印」>「將所選項目儲存至浮水印圖庫」。

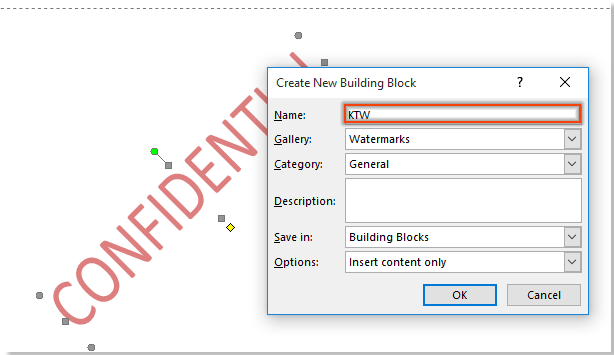
- 在「建立新建構元素」對話方塊中,為浮水印命名後,按一下「確定」。


步驟 3:從所有頁面移除浮水印
- 在「頁首及頁尾工具」索引標籤中,點選「關閉頁首與頁尾」。

- 前往「版面配置」>「浮水印」>「移除浮水印」,即可輕鬆清除整份文件中的浮水印。

步驟 4:在特定頁面插入自訂浮水印
- 在您要插入自訂浮水印的頁面上,任意點選一個位置。
- 點選「版面配置」>「浮水印」,捲動至「一般」群組(其中已儲存您的自訂浮水印),在該浮水印上按一下滑鼠右鍵,然後選擇「插入至目前文件位置」。


自訂浮水印現僅會顯示於所選頁面。
相關文章
最佳 Office 生產力工具
Kutools for Word——透過超過 100 項卓越功能,全面提升您的 Word 體驗!
🤖KUTOOLS AI 功能:AI 助手/即時助手/超級潤色(保留格式)/超級翻譯(保留格式)/AI 遮擋/AI 校正……
📘 文件掌控力:分割頁面/文檔合併/以多種格式匯出選取內容(PDF/TXT/DOC/HTML……)/批次轉換為 PDF……
✏ 內容編輯:批量查找與替換多個檔案/調整所有圖片大小/翻轉表格列與欄/表格轉文本……
🧹 輕鬆清理:一鍵清除多餘空格、分節符、文字框與超連結!想要更多清除工具?立即前往移除群組……
➕ 創意插入:插入千位分隔符/複選框/選項按鈕/二維碼/條碼/多張圖片/ 更多功能請至插入群組……
🔍 精準選取:精確定位特定頁面/表格/圖形/標題段落/ 透過更多選取功能提升導覽效率……
⭐ 星級增強功能:快速跳轉至任意位置/自動插入重複文字/在文件 Windows 之間切換/11 轉換工具……
🌍 支援 40+ 種語言:使用您熟悉的慣用語言暢享 Kutools!支援英文、西班牙文、德文、法文、中文等 40 多種語言,操作更順手、體驗更流暢!

Office Tab- 為 Office 帶來分頁式介面,讓您的工作更輕鬆
- 在 Word、Excel、PowerPoint、Publisher、Access、Visio 與 Project 中啟用分頁式編輯與閱讀體驗。
- 在同視窗的新分頁中開啟並建立多份文件,而非另開新視窗。
- 每天為您減少數百次滑鼠點擊,生產力提升 50%!
✨ Kutools for Office – 一次安裝,五大強大工具!
包含 Office Tab Pro·Kutools for Excel·Kutools for Outlook·Kutools for Word·Kutools for PowerPoint
📦 一套整合 5 項工具 | 🔗 與 Microsoft Office 無縫整合 | ⚡ 保存時間,立即提升生產力