如何在 Outlook 中設定多個電子郵件帳戶,讓每次撰寫新郵件時自動套用各自的簽名?
根據教學:Outlook 中的電子郵件簽名,您應已掌握如何在 Outlook 中建立簽名。然而,建立新簽名後,必須在郵件視窗中手動選取簽名> 已建立的簽名,才能將該簽名加入新郵件。
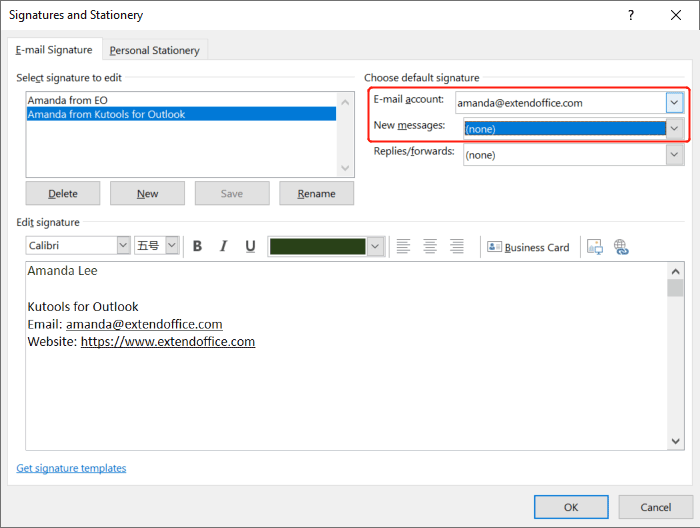
當然,您也可以透過點選簽名> 簽名,為特定電子郵件帳戶設定簽名,讓 Outlook 在您撰寫新郵件時自動加入(如下圖所示)!
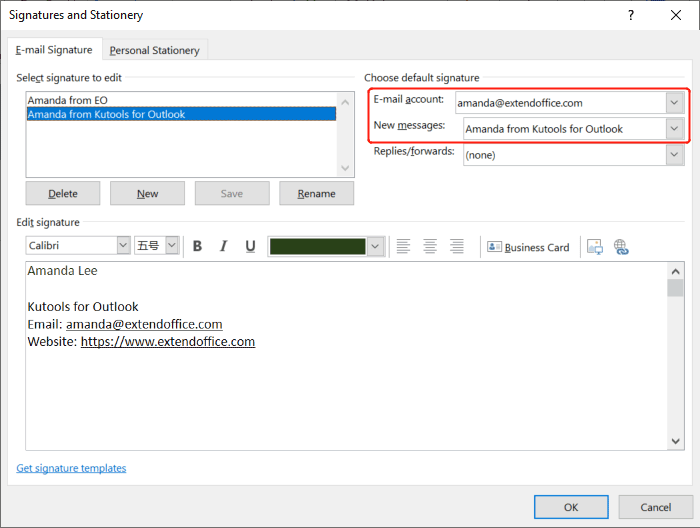
然而,若您擁有多個電子郵件帳戶,並希望為這些帳戶批次設定各自的簽名,該如何操作?本教學將介紹一種 VBA 方法,助您輕鬆達成此目標。
在 Outlook 中建立新建郵件時為多個電子郵件帳戶新增不同簽名
1. 在 Outlook 中,按下 Alt+F11 鍵,即可開啟 Microsoft Visual Basic for Applications 視窗!
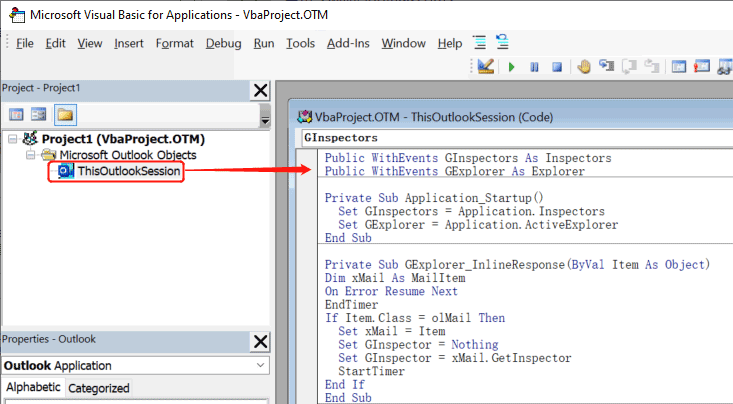
2. 在 Microsoft Visual Basic for Applications 視窗中,於專案窗格內雙擊 ThisOutlookSession,並將下方 VBA 程式碼貼入 ThisOutlookSession(程式碼)視窗中。請參閱截圖:
VBA 程式碼:在 Outlook 中建立新建郵件時為多個電子郵件帳戶新增不同簽名-ThisOutlookSession
Public WithEvents GInspectors As Inspectors
Public WithEvents GExplorer As Explorer

Private Sub Application_Startup()
  Set GInspectors = Application.Inspectors
  Set GExplorer = Application.ActiveExplorer
End Sub

Private Sub GExplorer_InlineResponse(ByVal Item As Object)
‘Update by ExtendOffice
Dim xMail As MailItem
On Error Resume Next
EndTimer
If Item.Class = olMail Then
  Set xMail = Item
  Set GInspector = Nothing
  Set GInspector = xMail.GetInspector
  StartTimer
End If
End Sub

Private Sub GInspectors_NewInspector(ByVal Inspector As Inspector)
  On Error Resume Next
  EndTimer
  Set GInspector = Nothing
  Set GInspector = Inspector
  StartTimer
End Sub
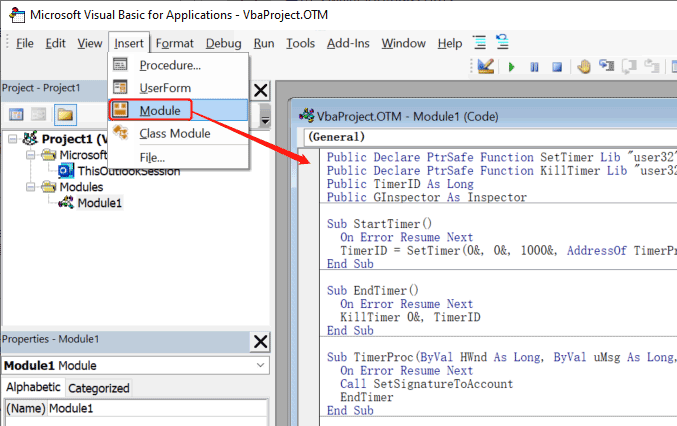
3. 在 Microsoft Visual Basic for Applications 視窗中,點選插入> 模組,接著將下列 VBA 程式碼複製到模組視窗中。
VBA 程式碼:在 Outlook 中建立新建郵件時為多個電子郵件帳戶新增不同簽名-模組
Public Declare PtrSafe Function SetTimer Lib "user32" (ByVal HWnd As Long, ByVal nIDEvent As Long, ByVal uElapse As Long, ByVal lpTimerFunc As LongPtr) As Long
Public Declare PtrSafe Function KillTimer Lib "user32" (ByVal HWnd As Long, ByVal nIDEvent As Long) As Long
Public TimerID As Long
Public GInspector As Inspector

Sub StartTimer()
  On Error Resume Next
  TimerID = SetTimer(0&, 0&, 1000&, AddressOf TimerProc)
End Sub

Sub EndTimer()
  On Error Resume Next
  KillTimer 0&, TimerID
End Sub

Sub TimerProc(ByVal HWnd As Long, ByVal uMsg As Long, ByVal nIDEvent As Long, ByVal dwTimer As Long)
  On Error Resume Next
  Call SetSignatureToAccount
  EndTimer
End Sub

Sub SetSignatureToAccount()
‘Update by ExtendOffice
Dim xMail As MailItem
Dim xSignatureFile, xSignaturePath As String
Dim xSubject As String
Dim xDoc As Document
Dim xAccount As Account
Dim xIsNew As Boolean
Dim xInspector As Inspector
Const PR_SMTP_ADDRESS As String = "http://schemas.microsoft.com/mapi/proptag/0x39FE001E"
On Error Resume Next
xSignaturePath = CreateObject("WScript.Shell").SpecialFolders(5) + "\Microsoft\Signatures\"
xSubject = GInspector.Caption
Set xDoc = GInspector.WordEditor
xIsNew = False
Set xMail = GInspector.CurrentItem
Select Case xMail.Parent.Parent
  Case "name1@example.com" 'Replace the email address in double quotes
    If VBA.InStr(xSubject, "RE: ") = 1 Then
      Exit Sub
    ElseIf VBA.InStr(xSubject, "FW: ") = 1 Then
      Exit Sub
    Else
      xSignatureFile = xSignaturePath & "Signature1.htm" 'Replace "Signature1" with your actual signature name
      xIsNew = True
    End If
  Case "name2@example.com" 'Replace the email address in double quotes
    If VBA.InStr(xSubject, "RE: ") Then
      Exit Sub
    ElseIf VBA.InStr(xSubject, "FW: ") Then
      Exit Sub
    Else
      xSignatureFile = xSignaturePath & "Signature2.htm" 'Replace "Signature2" with your actual signature name
      xIsNew = True
    End If
  'Add more Cases for more email accounts
End Select
If xIsNew = True Then
  With xDoc.Application.Selection
    .WholeStory
    .EndKey
    .InsertParagraphAfter
    .MoveDown Unit:=wdLine, Count:=1
    .InsertFile FileName:=xSignatureFile, Link:=False, Attachment:=False
  End With
Else
  With xDoc.Application.Selection
    .MoveRight Unit:=wdCharacter, Count:=1
    .HomeKey Emptyparam, Emptyparam
    .InsertFile FileName:=xSignatureFile, Link:=False, Attachment:=False
  End With
End If
Set xDoc = Nothing
Set GInspector = Nothing
Set xMail = Nothing
End Sub- 1)請將第 39 列與第 48 列中的 name 1@example.com 及 name 2@example.com 替換為您實際的電子信箱地址。
- 2)請將第 45 列與第 54 列中的 Signature 1 和 Signature 2 替換為您實際的簽名名稱。
- 3)透過上述 VBA 程式碼,我們可為兩個電子郵件帳戶設定簽名。若您擁有更多帳戶,請以額外的 Case 語句取代程式碼第 57 列:
If VBA.InStr(xSubject, "RE: ") = 1 Then
Exit Sub
ElseIf VBA.InStr(xSubject, "FW: ") = 1 Then
Exit Sub
Else
xSignatureFile = xSignaturePath & "Signature.htm"
xIsNew = True
End If
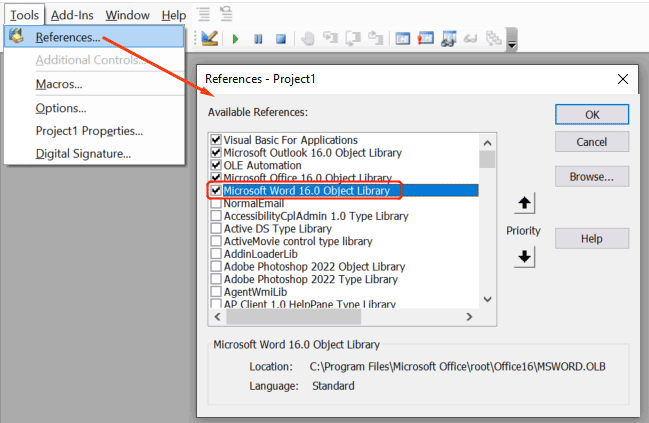
4. 在 Microsoft Visual Basic for Applications 視窗中,點選工具> 參考,勾選 Microsoft Word 16.0 物件庫 旁的核取方塊,再點選確定即可。
5. 重新啟動 Outlook 以儲存 VBA 程式碼。
6. 現在,當您使用已設定簽名的電子郵件帳戶撰寫新郵件時,對應的簽名將自動插入。
注意:若您發現使用電子郵件帳戶撰寫新郵件時出現兩個簽名,請在郵件視窗中點選簽名> 簽名。在「選擇預設簽名」區段中,選取該電子郵件帳戶,並於「新郵件」下拉選單中選擇(無)。
相關文章
如何在 Outlook 中匯入或插入 HTML 格式的簽名?
例如,您從網站下載了 HTML 格式的郵件簽名,想輕鬆匯入 Outlook?本文將一步步引導您順利將 HTML 簽名匯入或插入 Outlook。
在 Outlook 電子郵件中新增或移除背景顏色十分簡單,但該如何在 Outlook 簽名中插入或移除背景顏色呢?以下解決方法可協助您輕鬆完成此操作:
如何在 Outlook 中為多個電子郵件帳戶設定不同簽名,以便在回覆或轉寄郵件時自動套用?
若希望 Outlook 在您回覆或轉寄郵件時自動插入簽名,請前往「簽名」>「簽名」設定預設簽名,並為特定電子郵件帳戶指定對應的簽名(如下圖所示)。然而,若您擁有多個電子郵件帳戶,並希望一次為多個帳戶分別設定不同的簽名,該如何操作?本教學將介紹一種 VBA 方法,助您輕鬆達成此目標。
一般來說,您可以在 Outlook 中為不同帳戶設定各自的簽名,但您是否試過為「回覆」和「轉寄」郵件分別套用不同的簽名?也就是說,回覆郵件時自動插入簽名 1,而轉寄郵件時則使用簽名 2. 該如何在 Outlook 中實現這個功能呢?
最佳 Office 生產力工具
體驗全新 Kutools for Outlook,內含 100+ 項超強功能!立即點擊下載!
🤖KUTOOLS AI:運用先進 AI 技術,輕鬆處理電子郵件——無論是回覆、摘要、優化、擴充、翻譯還是撰寫郵件,通通一鍵搞定!
📧 郵件自動化:自動答覆(支援 POP 與 IMAP)/預約寄送郵件/寄信時依規則自動抄送密送/自動轉發(高級規則)/自動加入問候語/自動將多收件人郵件拆分為個別訊息……
📨 郵件管理:撤回郵件/依主旨等條件封鎖詐騙郵件/刪除重複郵件/高級搜尋/整合文件夾……
📁 附件專業版:批次儲存/批次解除附加/批次壓縮/自動保存/自動拆離/自動壓縮……
🌟 介面魔法:😊更多精美酷炫表情符號/重要郵件來到時提醒您/最小化 Outlook 而非關閉……
👍 一鍵奇蹟:帶附件全部答復/防釣魚郵件/🕘顯示發送者當前時間時區……
👩🏼🤝👩🏻 聯絡人與行事曆:從選取的郵件中批次新增聯絡人/將聯繫人組拆分為個別群組/移除生日提醒……
用您的慣用語言暢享 Kutools — 完整支援英文、西班牙文、德文、法文、中文等 40 多種語言!
立即一鍵解鎖 Kutools for Outlook!別再等待,馬上下載,全面提升工作效率!


🚀 一鍵下載 — 立即取得所有 Office 增益集
強烈推薦:Kutools for Office(5 合 1)
一鍵下載五個安裝程式,一次完成 — Kutools for Excel、Outlook、Word、PowerPoint 與 Office Tab Pro!立即點擊下載!
- ✅ 一鍵便利:只需一次操作,即可下載全部五個安裝套件!
- 🚀 隨時應對任何 Office 任務:按需安裝所需增益集,立即提升工作效率!
- 🧰 包含:Kutools for Excel/Kutools for Outlook/Kutools for Word/Office Tab Pro/Kutools for PowerPoint