如何在Outlook中根據郵件的時間自動突出顯示?
如果您的收件匣中有數千封電子郵件,現在您想根據郵件的存在時間來突出顯示它們,這意味著讓這些郵件因其在信箱中的時間長短而顯得突出。本文將介紹如何在Outlook中完成此操作。
在Outlook中根據郵件時間自動突出顯示
例如,我需要突出顯示那些已存在10到20天的郵件,請按照以下步驟操作:
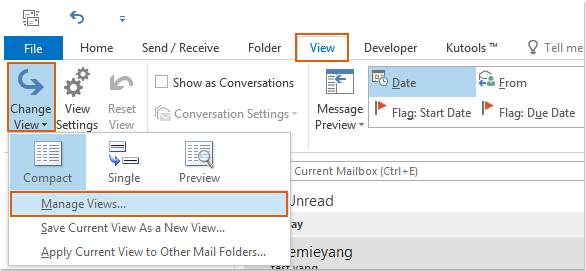
1. 啟動Outlook,然後點擊 檢視 > 變更檢視 > 管理檢視,參見截圖:
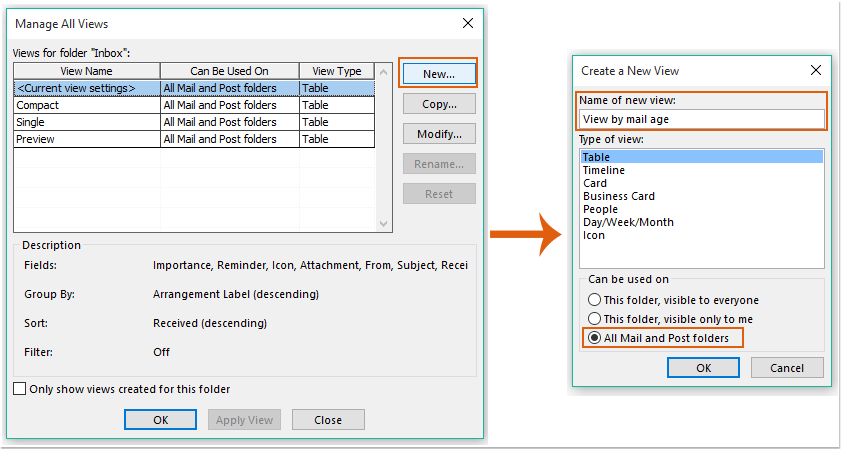
2. 接著會彈出一個管理所有檢視對話框,點擊「新增」按鈕進入建立新檢視對話框,在 建立新檢視對話框中,在 新檢視名稱文字框中輸入該新檢視的名稱,然後從可使用於部分選擇 所有郵件和郵遞資料夾,參見截圖:
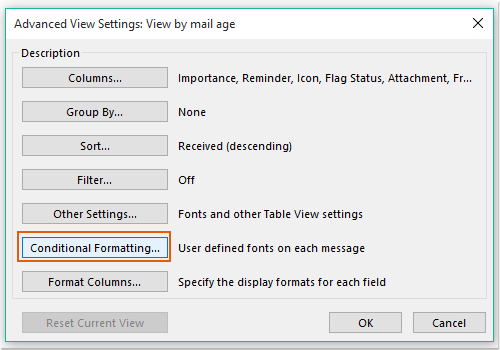
3. 然後點擊「確定」按鈕進入另一個「進階檢視設定」對話框,點擊「條件格式化」按鈕,參見截圖:
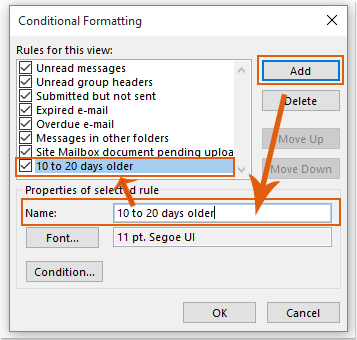
4. 在彈出的「條件格式化」對話框中,點擊 「新增」按鈕,然後在「名稱」文字框中指定此規則的名稱,並且該規則名稱將自動添加到「此檢視的規則」列表框中,參見截圖:
5. 接著在這個「條件格式化」對話框中點擊「字型」按鈕,將會顯示一個 「字型」對話框,然後您可以根據需要設置用於突出顯示郵件的字型格式,參見截圖:
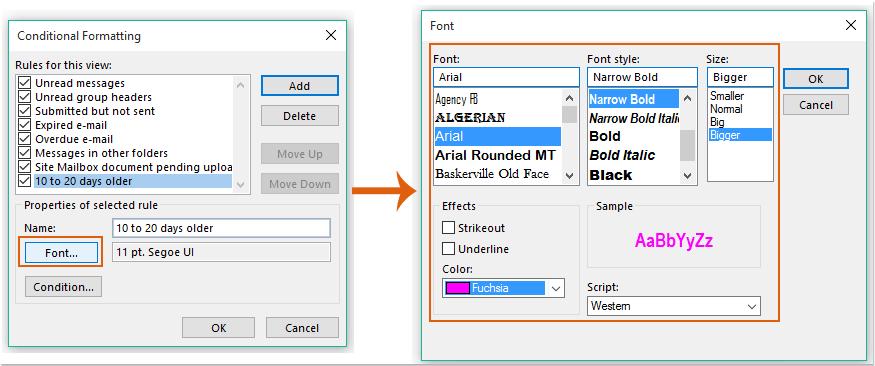
6. 點擊「確定」返回「條件格式化」對話框,繼續點擊「條件」按鈕進入「 篩選」對話框,在「 篩選」對話框中,請進行以下操作:
(1.) 點擊「進階」標籤;
(2.) 然後從 「欄位」下拉列表中選擇「常用欄位 > 接收時間」 ;
(3.) 接著在「條件」下拉列表中選擇「介於」;
(4.) 最後,在「值」文字框中輸入您要根據日期範圍突出顯示郵件的「10天前」和「20天前」。
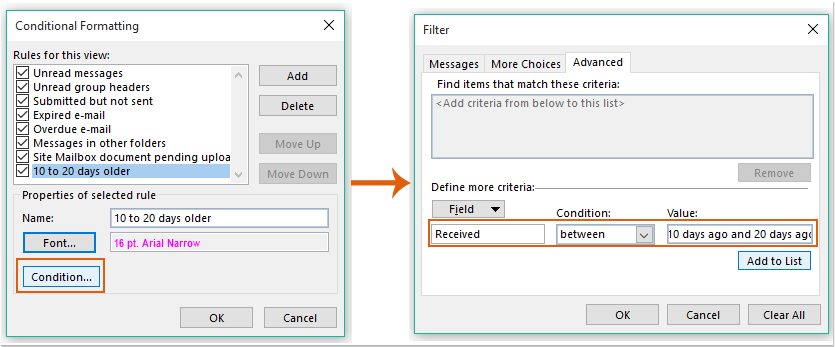
7. 然後點擊「 添加到清單」按鈕,將此條件添加到「符合這些條件的項目」列表框中。
8. 並點擊「確定」逐一關閉所有對話框。
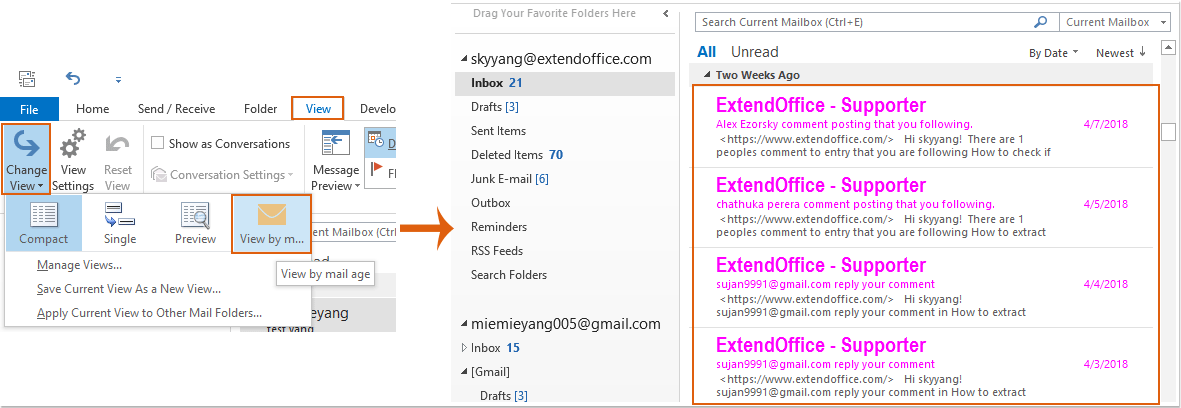
9. 現在,點擊檢視 > 變更檢視 > 按郵件時間檢視以切換到您新創建的檢視,並且所有特定的郵件(即10到20天前的郵件)都已立即被突出顯示。參見截圖:
注意:
1. 從現在開始,突出顯示的郵件將根據其時間自動更改。
2. 此方法適用於Outlook中的所有郵件帳戶,但IMAP郵件帳戶除外。
最佳辦公室生產力工具
最新消息:Kutools for Outlook 推出免費版本!
體驗全新 Kutools for Outlook,超過100項精彩功能!立即下載!
🤖 Kutools AI :採用先進的AI技術輕鬆處理郵件,包括答覆、摘要、優化、擴充、翻譯及撰寫郵件。
📧 郵件自動化:自動回覆(支援POP及IMAP) / 排程發送郵件 / 發送郵件時根據規則自動抄送密送 / 自動轉發(高級規則) / 自動添加問候語 / 自動分割多收件人郵件為個別郵件 ...
📨 郵件管理:撤回郵件 / 根據主題等方式阻止詐騙郵件 / 刪除重複郵件 / 高級搜索 / 整合文件夾 ...
📁 附件專業工具:批量保存 / 批量拆離 / 批量壓縮 / 自動保存 / 自動拆離 / 自動壓縮 ...
🌟 介面魔法:😊更多精美與酷炫表情符號 /重要郵件來臨時提醒 / 最小化 Outlook 而非關閉 ...
👍 一鍵便利:帶附件全部答復 / 防詐騙郵件 / 🕘顯示發件人時區 ...
👩🏼🤝👩🏻 聯絡人與日曆:從選中郵件批量添加聯絡人 / 分割聯絡人組為個別組 / 移除生日提醒 ...
以您偏好的語言使用 Kutools,支援英語、西班牙語、德語、法語、中文及超過40種其他語言!
只需點擊一次,即可立即解鎖 Kutools for Outlook。別等了,現在下載提升您的工作效率!


🚀 一鍵下載 — 獲取全部 Office 插件
強力推薦:Kutools for Office(5合1)
一鍵下載五個安裝程式,包括 Kutools for Excel, Outlook, Word, PowerPoint及 Office Tab Pro。 立即下載!
- ✅ 一鍵便利:一次操作即可下載全部五套安裝包。
- 🚀 隨時處理任何 Office 任務:安裝您需求的插件,隨時隨地。
- 🧰 包含:Kutools for Excel / Kutools for Outlook / Kutools for Word / Office Tab Pro / Kutools for PowerPoint