跳到主要內容

如何在Outlook中查看電子郵件之間的網格線?

如您所知,Microsoft Outlook郵件列表中的電子郵件之間有分隔線。 您不僅可以隱藏或顯示這些網格線,還可以更改網格線的樣式。 這是一個簡單的教程,用於顯示,隱藏和更改Microsoft Outlook郵件列表中電子郵件之間的網格線樣式。

Office 標籤 - 在 Microsoft Office 中啟用選項卡式編輯和瀏覽,讓工作變得輕而易舉
Kutools for Outlook - 透過 100 多個進階功能增強 Outlook,實現卓越效率
使用這些進階功能增強您的 Outlook 2021 - 2010 或 Outlook 365。 享受全面的 60 天免費試用並提升您的電子郵件體驗!

要顯示,隱藏或更改Microsoft Outlook郵件列表中的網格線樣式,請按照以下步驟操作:

第1步:點擊轉到郵件視圖 郵件 在導航窗格中,然後選擇郵件文件夾,您將在其中查看電子郵件之間的網格線。

步驟2:打開“高級視圖設置”對話框:

  • 在Outlook 2007中,請點擊 瀏覽 > 目前來看 > 自定義當前視圖.
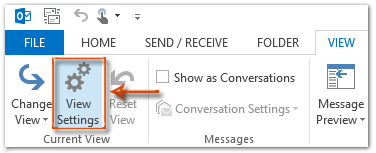
  • 在Outlook 2010和2013中,請點擊 查看設置 上的按鈕 瀏覽 標籤。

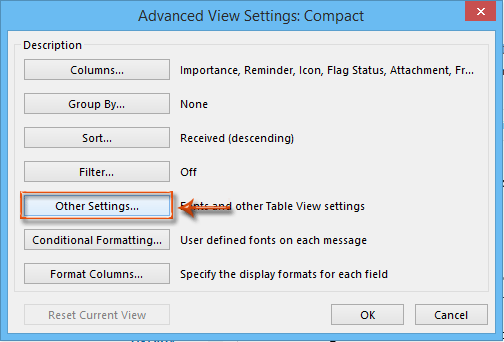
步驟3:在彈出的對話框中,請點擊 其他設置 按鈕。

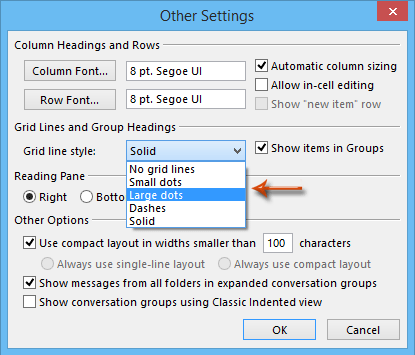
步驟4:在[其他設定]對話方塊中,按一下 網格線樣式: 框,然後在下拉列表中選擇網格線樣式之一。

要隱藏電子郵件之間的網格線,請選擇“無網格線”。

要更改電子郵件之間的網格線樣式,請選擇小點,大點,破折號或實心之一。

步驟5:全部點擊 OK 每個對話框中的按鈕。

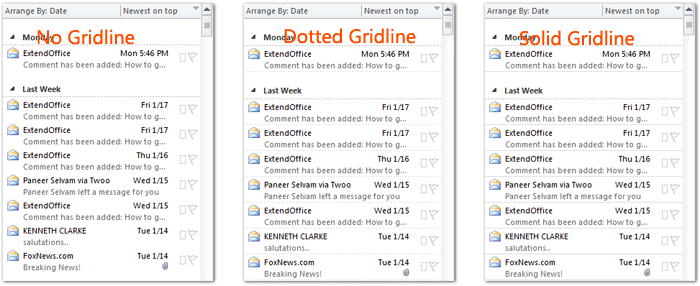
到目前為止,指定文件夾中所有電子郵件之間的指定網格線樣式已更改。 請參見以下屏幕截圖:

在Outlook 2010和2013中,可以通過單擊指定文件夾將指定文件夾的視圖設置應用於其他文件夾 更改視圖 > 將當前視圖應用於其他郵件文件夾 瀏覽 標籤。


最佳辦公生產力工具

Kutools for Outlook - 超過 100 種強大的功能可增強您的 Outlook

🤖 人工智慧郵件助手: 具備人工智慧魔力的即時專業電子郵件——一鍵天才回覆、完美語調、多語言掌握。輕鬆改變電子郵件! ……

📧 電子郵件自動化: 外出(適用於 POP 和 IMAP)  /  安排發送電子郵件  /  發送電子郵件時按規則自動抄送/密件副本  /  自動轉送(進階規則)   /  自動添加問候語   /  自動將多收件者電子郵件拆分為單獨的訊息 ...

📨 電子郵件管理: 輕鬆回憶電子郵件  /  按主題和其他人阻止詐騙電子郵件  /  刪除重複的電子郵件  /  進階搜索  /  合併資料夾 ...

📁 附件專業版批量保存  /  批量分離  /  批量壓縮  /  自動保存   /  自動分離  /  自動壓縮 ...

🌟 介面魔法: 😊更多又漂亮又酷的表情符號   /  使用選項卡式視圖提高 Outlook 工作效率  /  最小化 Outlook 而不是關閉 ...

👍 一鍵奇蹟: 使用傳入附件回覆全部  /   反網路釣魚電子郵件  /  🕘顯示寄件者的時區 ...

👩🏼‍🤝‍👩🏻 通訊錄和行事曆: 從選定的電子郵件中大量新增聯絡人  /  將聯絡人群組拆分為各組  /  刪除生日提醒 ...

超過 100特點 等待您的探索! 按此處了解更多。

閱讀更多       免費下載      購買


Comments (20)
No ratings yet. Be the first to rate!
This comment was minimized by the moderator on the site
Is there a way to darken the grid lines?
This comment was minimized by the moderator on the site
Just follow the instructions. It worked for me.
This comment was minimized by the moderator on the site
I have Outlook 365 and no matter what I do the grid lines will not show up. I've tried selecting all of the different types of gridlines but nothing. Does this have anything to do with having selected ALWAYS USE SINGLE-LINE LAYOUT? in OTHER SETTINGS?
This comment was minimized by the moderator on the site
IT just installed MS Office 365 - 2016 and it worked like a charm, thanks.
This comment was minimized by the moderator on the site
How long ago was this simple question posted? There is still no legitimate answer. Grid lines are invisible! Why won't microsoft fix this serious inadequacy ?!
This comment was minimized by the moderator on the site
How long ago was this simple question posted? There is still no legitimate answer. Why won't microsoft fix this serious inadequacy ?!
This comment was minimized by the moderator on the site
Worked very well thank you.
This comment was minimized by the moderator on the site
RJ- No one else has been able to make this work. Please provide a screen shot which shows you have solid grid lines after following this procedure.
This comment was minimized by the moderator on the site
@Tony Where do you change the Office Theme to black?
This comment was minimized by the moderator on the site
So this is the best Microsoft can do after 2000 years ????
This comment was minimized by the moderator on the site
I've had this same issue. This works for me but I also have hundreds of sub folders which I don't want to have to manually go through and fix the setting. Also when I create a new subfolder in my inbox the grid lines still don't show up. How can I create a new folder with the grid lines automatically showing up?
There are no comments posted here yet
Load More
Please leave your comments in English
Posting as Guest
×
Rate this post:
0   Characters
Suggested Locations