如何在 Outlook 中新增、關閉與移除資料檔?
預設情況下,每個電子郵件帳戶都會自動建立資料檔案。然而,有時您可能需要額外建立資料檔案,用於封存、分類等用途。以下提供幾種簡易方法,協助您快速在導航窗格或 Microsoft Outlook 中建立(.pst)資料檔案並移除資料檔。
在 Outlook 2010 與 2013 中新增資料檔(.pst)
在 Outlook 2010 與 2013 中從導航關閉資料檔案
在 Outlook 2007 中新增與移除資料檔(.pst)
在 Outlook 2010 與 2013 中新增資料檔(.pst)
在 Microsoft Outlook 2010 與 2013 中,有多種方式可新增或建立資料檔案(.pst)。
方法 1:透過「新增」功能新增資料檔(.pst)
步驟 1:在 Outlook 2010/2013 中,點擊首頁索引標籤中、位於新建類別下方的新增項目> 其他項目>Outlook 資料檔。請參閱下列螢幕截圖:

步驟 2:在彈出的「建立或開啟 Outlook 資料檔」對話方塊中,於檔案名稱欄位輸入新資料檔名稱。

步驟 3:點擊確定按鈕,即可關閉對話方塊。
接著,新建立的資料檔將顯示於 Microsoft Outlook 2010/2013 的導航窗格中。請參閱下方螢幕截圖:
方法 2:在帳戶設置中心中建立新的資料檔(.pst)
步驟 1:前往位於檔案索引標籤下方的資訊分類。
步驟 2:點擊帳戶設定按鈕,再於下拉選單中選擇帳戶設定項目。

步驟 3:在帳戶設定對話方塊中,點擊位於資料檔案索引標籤下方的新增按鈕。
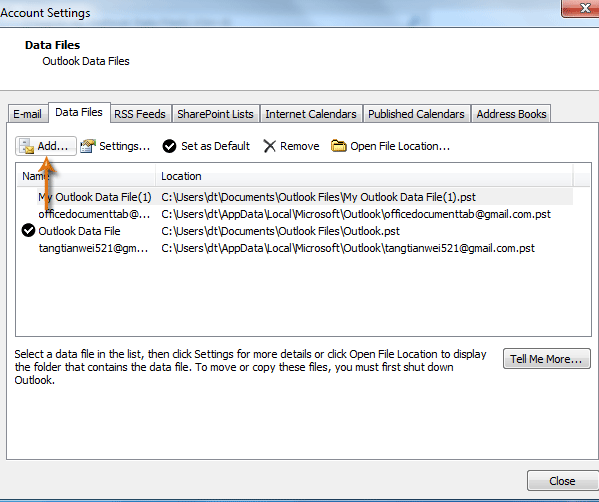
步驟 4:此時將出現 建立或開啟 Outlook 資料檔對話方塊,請在檔案名稱欄位中輸入新資料檔的名稱。
步驟 5:點擊確定按鈕,立即關閉對話方塊!
完成上述步驟後,新建立的資料檔將立即以資料夾形式顯示於導航中。
Outlook 中的 AI 郵件助理:聰明回覆、清晰溝通,一鍵輕鬆搞定!
透過 Kutools for Outlook 的 AI 郵件助理,輕鬆簡化您每日的 Outlook 工作!這款強大工具能學習您過往的郵件內容,提供智慧又精準的回覆建議、優化郵件文字,並協助您毫不費力地起草與潤飾訊息。

此功能支援:
- 智慧回覆:根據您過往的對話,量身打造精準到位的回應,立即可用。
- 內容強化:自動優化您的郵件文字,提升清晰度與影響力。
- 輕鬆撰寫:只需提供關鍵字,其餘交給 AI 處理,並支援多種潤色風格。
- 智慧擴充:根據上下文提供貼心建議,延伸您的創意與想法。
- 摘要功能:立即獲取長篇郵件的簡明摘要。
- 全球溝通:輕鬆將郵件翻譯成任何語言。
此功能支援:
- 智慧郵件回覆
- 優化內容
- 關鍵字草稿
- 智慧內容擴充
- 郵件摘要
- 多語言翻譯
別再等待——立即下載 AI 郵件助理,盡情享受!
在 Outlook 2010 與 2013 中從導航關閉資料檔案
您可能已在 Microsoft Outlook 中建立了一些資料檔案,但其中某些檔案目前較少使用。因此,您可以從導航窗格中關閉這些資料檔案。
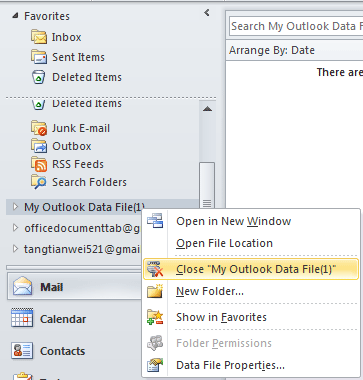
步驟 1:在導航中選取您要移除的資料檔。
步驟 2:以滑鼠右鍵點擊該資料檔名稱,並於下拉式選單中點擊 關閉「My Outlook Data File(1)」。
注意:My Outlook Data File(1) 將自動更新為您的資料檔名稱。
接著,該資料檔就會從 Microsoft Outlook 2010/2013 的導航窗格中消失。
注意:點擊 關閉「My Outlook Data File(1)」 後,當您進入位於帳戶設定中的資料檔案區段,會發現該資料檔已從此處消失。
在 Outlook 2010 與 2013 中移除資料檔案
若要從 Microsoft Outlook 2010/2013 刪除 Outlook 資料檔,請執行下列步驟:
步驟 1:依序點擊檔案> 資訊> 帳戶設定> 帳戶設定,即可開啟帳戶設定對話方塊。
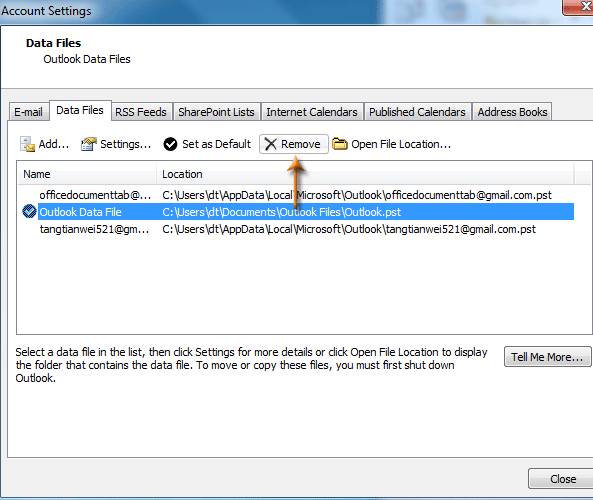
步驟 2:在資料檔案索引標籤下方的資料文件列表中,選取資料檔名稱。
步驟 3:點擊移除按鈕。
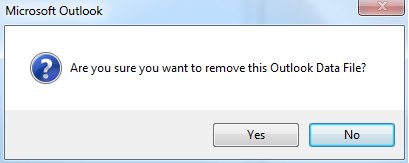
步驟 4:在彈出的對話方塊中,點擊是按鈕。
步驟 5:點擊關閉按鈕,即可關閉帳戶設定對話方塊。
現在,該資料檔已從 Microsoft Outlook 2010/2013 中成功移除。
在 Outlook 2007 中新增與移除資料檔(.pst)
在 Outlook 2007 中新增資料檔(.pst)
步驟 1:在 Outlook 2007 中,點擊檔案> 新增>Outlook 資料檔。
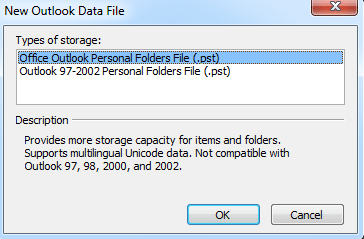
步驟 2:在「新增 Outlook 資料檔」對話方塊中,於儲存類型方框中選取 Office Outlook 個人資料夾檔案(。pst)項目後,點擊確定。
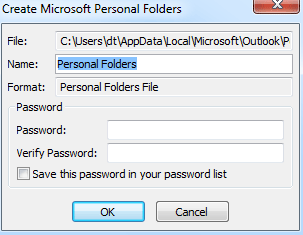
步驟 3:在 建立或開啟 Outlook 資料檔對話方塊中,輸入檔案名稱後,點擊確定。
步驟 4:在出現 建立 Microsoft 個人資料夾對話方塊後,您可以選擇為該資料檔設定密碼,然後點擊確定。
在 Outlook 2007 中從導航關閉資料檔(.pst)
在導航窗格中,以滑鼠右鍵點擊您要關閉的資料檔,然後從下拉式選單中選取「關閉 My Outlook Data File(1)」。
順帶一提,選擇資料檔案時將顯示為名稱「My Outlook Data File(1)」。
從 Outlook 2007 移除資料檔(.pst)
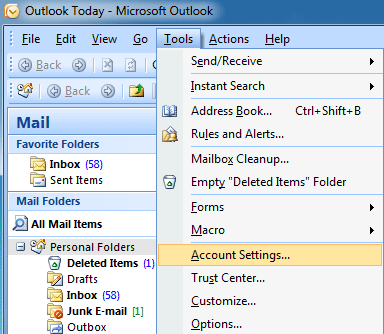
步驟 1:在 Outlook 2007 中,點擊工具> 帳戶設定。
步驟 2:在帳戶設定對話方塊中,於資料檔案索引標籤下方,選取您要移除的資料檔。
步驟 3:點擊移除按鈕。
步驟 4:在彈出的對話方塊中,點擊是按鈕。
最後關閉帳戶設定對話方塊,此時所選的資料檔案已從 Outlook 2007 中刪除。
最佳 Office 生產力工具
體驗全新 Kutools for Outlook,內含 100+ 項超強功能!立即點擊下載!
🤖KUTOOLS AI:運用先進 AI 技術,輕鬆處理電子郵件——無論是回覆、摘要、優化、擴充、翻譯還是撰寫郵件,通通一鍵搞定!
📧 郵件自動化:自動答覆(支援 POP 與 IMAP)/預約寄送郵件/寄信時依規則自動抄送密送/自動轉發(高級規則)/自動加入問候語/自動將多收件人郵件拆分為個別訊息……
📨 郵件管理:撤回郵件/依主旨等條件封鎖詐騙郵件/刪除重複郵件/高級搜尋/整合文件夾……
📁 附件專業版:批次儲存/批次解除附加/批次壓縮/自動保存/自動拆離/自動壓縮……
🌟 介面魔法:😊更多精美酷炫表情符號/重要郵件來到時提醒您/最小化 Outlook 而非關閉……
👍 一鍵奇蹟:帶附件全部答復/防釣魚郵件/🕘顯示發送者當前時間時區……
👩🏼🤝👩🏻 聯絡人與行事曆:從選取的郵件中批次新增聯絡人/將聯繫人組拆分為個別群組/移除生日提醒……
用您的慣用語言暢享 Kutools — 完整支援英文、西班牙文、德文、法文、中文等 40 多種語言!
立即一鍵解鎖 Kutools for Outlook!別再等待,馬上下載,全面提升工作效率!


🚀 一鍵下載 — 立即取得所有 Office 增益集
強烈推薦:Kutools for Office(5 合 1)
一鍵下載五個安裝程式,一次完成 — Kutools for Excel、Outlook、Word、PowerPoint 與 Office Tab Pro!立即點擊下載!
- ✅ 一鍵便利:只需一次操作,即可下載全部五個安裝套件!
- 🚀 隨時應對任何 Office 任務:按需安裝所需增益集,立即提升工作效率!
- 🧰 包含:Kutools for Excel/Kutools for Outlook/Kutools for Word/Office Tab Pro/Kutools for PowerPoint