如何在 Excel 中創建點圖?
點圖是一種簡單而有效的方式,可沿單一軸線視覺化數據點。雖然 Excel 沒有內建的點圖圖表類型,但您可以輕鬆使用散點圖或堆疊條形圖來創建一個。本指南將帶您逐步了解如何在 Excel 中創建點圖,並提供自定義的技巧和提示。

使用 Kutools for Excel 在 Excel 中創建點圖(3 個步驟)
在 Excel 中創建點圖
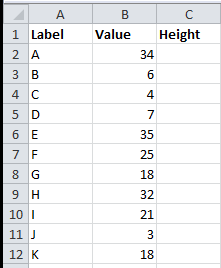
要創建點圖,您需要一個公式來計算每個數據的相對高度數據。
高度數據為 Y 軸提供垂直坐標。
1. 選擇第一個單元格並在數據旁邊的列中輸入“Height”,這裡我選擇 C1。參見截圖:

2. 然後在 C2 中,輸入此公式 =(ROWS($A$2:$A$12)-ROW()+ROW($A$2:$A$12)-0.5)/ROWS($A$2:$A$12),按“Enter”鍵並將自動填充手柄拖動到您需要應用此公式的範圍。參見截圖:

3. 選擇第一和第二列(標籤列和值列)數據,然後點擊“插入” > “條形圖” > “簇狀條形圖”。參見截圖:

4. 選擇圖表中的圖例,然後按“Delete”鍵刪除它。參見截圖:
 |
 |
在 Excel 2013 中,圖例默認不會添加到圖表中。如果圖例存在,請刪除它。
5. 然後選擇第二和第三列(值列和高度列)數據,右鍵單擊並從上下文菜單中選擇“複製”。參見截圖:

6. 然後點擊圖表,並點擊“開始” > “粘貼” > “選擇性粘貼”。參見截圖:

7. 然後在彈出的“選擇性粘貼”對話框中,在“添加單元格為”部分勾選“新系列”選項,在“值 (Y)”部分勾選“列”,並同時勾選“系列名稱在第一行”和“分類 (X 標籤) 在第一列”的選項。參見截圖:

8. 然後點擊“確定”,您可以看到條形圖變成如下所示:

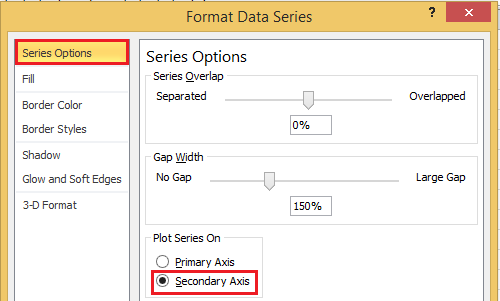
9. 右鍵單擊第一個系列(藍色的那個),然後從上下文菜單中選擇“設置數據系列格式”。參見截圖:

10. 在“系列選項”部分,勾選“次坐標軸”。參見截圖:

在 Excel 2013 中,在“設置數據系列格式”窗格的“系列選項”部分下勾選“次坐標軸”。
11. 關閉對話框,然後繼續選擇藍色系列,並點擊“布局” > “坐標軸” > “次縱坐標軸” > “顯示默認坐標軸”。參見截圖:

在 Excel 2013 中,點擊“設計” > “添加圖表元素” > “坐標軸” > “次縱坐標軸”。
然後您可以看到條形圖如下所示:

12. 點擊紅色系列,然後轉到“設計”選項卡,並選擇“更改圖表類型”。參見截圖:

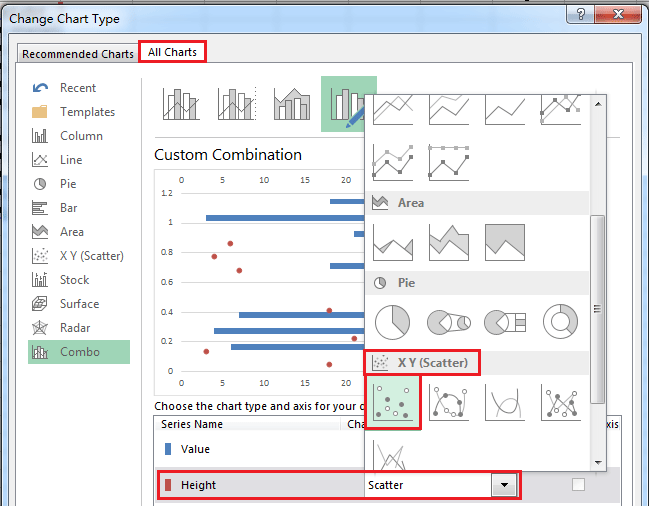
13. 在“更改圖表類型”對話框中,點擊“XY(散點圖)”部分,然後點擊“僅帶標記的散點圖”。參見截圖:

在 Excel 2013 中,您需要在“更改圖表類型”對話框中點擊“All Charts”選項卡,然後點擊“Height”系列名稱旁的箭頭,並從列表中選擇“散點圖”。參見截圖:

15. 點擊“確定”。現在您需要將標記更改為圓圈。右鍵單擊紅色標記,並選擇“設置數據系列格式”。參見截圖:

16. 在“設置數據系列格式”對話框中,點擊“標記選項”選項卡,並勾選“內建”選項,然後從“類型”列表中選擇圓圈。參見截圖:

在 Excel 2013 中,您不需要將標記更改為圓圈。
17. 關閉對話框。然後右鍵單擊主 Y 軸(左側的那個),並從上下文菜單中選擇“設置坐標軸格式”。參見截圖:

18. 然後在“設置坐標軸格式”對話框中,轉到“坐標軸選項”部分,勾選“固定”選項後面的“最小值”,並在隨後的文本框中輸入“0”;勾選“固定”選項後面的“最大值”,並在隨後的文本框中輸入“1”。然後勾選“坐標軸值”,並在“水平坐標軸交叉”部分的文本框中輸入“0”。然後關閉對話框。

在 Excel 2013 中,您只需直接在“最小值”和“最大值”文本框中輸入“0”和“1”,並在“設置坐標軸格式”窗格中勾選“坐標軸值”並輸入“0”。

現在圖表如下所示:

19. 然後右鍵單擊主 X 軸(底部的那個),並選擇“設置坐標軸格式”。

20. 在“設置坐標軸格式”對話框或“設置坐標軸格式”窗格中,勾選“垂直坐標軸交叉”部分中的“最大坐標軸值”,然後關閉對話框。


21. 右鍵單擊次 X 軸(頂部的那個),並選擇“設置坐標軸格式”。

22. 然後在“設置坐標軸格式”對話框或“設置坐標軸格式”窗格中,勾選“垂直坐標軸交叉”部分中的“自動”選項。然後關閉對話框。
 |
 |
23. 右鍵單擊主 Y 軸(右側的那個),並選擇“設置坐標軸格式”,然後在“設置坐標軸格式”對話框中,從“坐標軸標籤”列表中選擇“無”。然後關閉對話框。

在 Excel 2013 中,您需要點擊“LABELS”以展開其部分,並從“標籤位置”列表中選擇“無”。

24. 同樣,右鍵單擊次 X 軸(頂部的那個),並選擇“設置坐標軸格式”,然後在“設置坐標軸格式”對話框中,從“坐標軸標籤”列表中選擇“無”。然後關閉對話框。然後您可以看到圖表如下截圖所示:

25. 右鍵單擊 Y 軸,並選擇“設置坐標軸格式”,然後在彈出的“設置坐標軸格式”對話框或“設置坐標軸格式”窗格中,勾選“反向順序的分類”和“自動”選項。參見截圖:
 |
 |
 |
26. 右鍵單擊條形圖,並選擇“設置數據系列格式”。然後在對話框中,點擊“填充”選項卡並勾選“無填充”選項。
 |
 |
在 Excel 2013 中,點擊“Fill & Line” > “Fill” > “No fill”在“設置數據系列格式”窗格中。參見截圖:

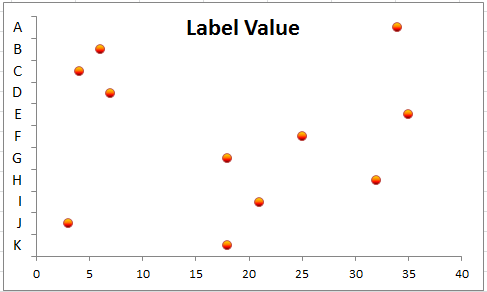
27. 關閉對話框,現在已創建了一個簡單的點圖。

您可以根據自己的喜好進行格式化。

使用 Kutools for Excel 在 Excel 中創建點圖(3 個步驟)
在 Excel 中手動創建點圖可能耗時且複雜,幸運的是,Kutools for Excel 使用其用戶友好的工具簡化了這一過程。通過其“點圖”功能,您只需幾次點擊即可生成專業外觀的點圖圖表,以清晰有效地視覺化您的數據。
安裝 Kutools for Excel 後,請按照以下步驟操作:
- 點擊“Kutools” > “圖表” > “類別對比” > “點圖”,參見截圖:

- 在“點圖”對話框中,分別選擇“軸標籤”和“系列值”數據範圍,參見截圖:

- 然後,點擊“確定”按鈕,點圖立即創建完成,參見截圖:

總之,使用各種方法可以在 Excel 中高效地創建點圖。無論您選擇使用 Excel 的內建功能還是 Kutools for Excel 來創建點圖,這個過程都可以快速且簡單。通過選擇最適合您需求和數據複雜性的方法,您可以增強數據視覺化效果,使您的分析更具影響力。如果您有興趣探索更多 Excel 技巧和竅門,我們的網站提供了數千個教程。
相關文章:
最佳 Office 生產力工具
| 🤖 | Kutools AI 助手:以智能執行為基礎,革新數據分析 |生成程式碼 | 創建自訂公式 | 分析數據並生成圖表 | 調用 Kutools 增強函數… |
| 熱門功能:查找、選取項目的背景色或標記重複值 | 刪除空行 | 合併列或單元格且不遺失數據 | 四捨五入(免公式)... | |
| 高級 LOOKUP:多條件 VLookup|多值 VLookup|多表查找|模糊查找... | |
| 高級下拉列表:快速創建下拉列表 |依賴型下拉列表 | 多選下拉列表... | |
| 列管理器:添加指定數量的列 | 移動列 | 切換隱藏列的顯示狀態 | 比較區域及列... | |
| 精選功能:網格聚焦 | 設計檢視 | 增強編輯欄 | 工作簿及工作表管理器 | 資源庫(快捷文本) | 日期提取器 | 合併資料 | 加密/解密儲存格 | 按列表發送電子郵件 | 超級篩選 | 特殊篩選(篩選粗體/傾斜/刪除線...)... | |
| 15 大工具集:12 項文本工具(添加文本、刪除特定字符…)|50+ 儀表 類型(甘特圖等)|40+ 實用 公式(基於生日計算年齡等)|19 項插入工具(插入QR码、根據路徑插入圖片等)|12 項轉換工具(金額轉大寫、匯率轉換等)|7 項合併與分割工具(高級合併行、分割儲存格等)|...及更多 |
運用 Kutools for Excel,全面提升您的 Excel 技能,體驗前所未有的高效。 Kutools for Excel 提供超過300 項進階功能,讓您提升工作效率、節省時間。 點此尋找您最需要的功能...
Office Tab 為 Office 帶來分頁介面,讓您的工作更加輕鬆簡單
- 在 Word、Excel、PowerPoint 中啟用分頁編輯與閱讀。
- 在同一視窗的新分頁中打開與創建多份文件,而非開啟新視窗。
- 提升您的生產力50%,每日可幫您減少數百次鼠標點擊!
所有 Kutools 外掛,一次安裝
Kutools for Office 套裝整合了 Excel、Word、Outlook 和 PowerPoint 的外掛,外加 Office Tab Pro,非常適合需要跨 Office 應用程式協同作業的團隊。
- 全合一套裝 — Excel、Word、Outlook及 PowerPoint 外掛 + Office Tab Pro
- 一鍵安裝,一份授權 — 幾分鐘完成設置(支援 MSI)
- 協同運作更順暢 — Office 應用間無縫提升生產力
- 30 天全功能試用 — 無需註冊、無需信用卡
- 最超值 — 一次購買,節省單獨外掛費用


